ゲーム制作の進捗報告、その他雑談等々。
浅海*写真からマップチップを作ってみる記事。
2016.11.08
自分用の忘備録も兼ねて、EngelslieD用に作成しているマップチップの作り方などをまとめてみました。
ドット絵なんて描けない。
センス? 何それおいしいの? という私でも簡単にそれっぽいチップセット(建物外観)が作れます。
ぜひぜひ、色んな元写真で試してみて下さい。
●はじめに
本TIPSは、写真データをマップチップに加工するものです。
写真撮影の際は肖像権・著作権に留意し、トラブルのないようご注意ください。
加工には、画像ソフトが必要です(Photo Shop Elementsなど)
●STEP 1
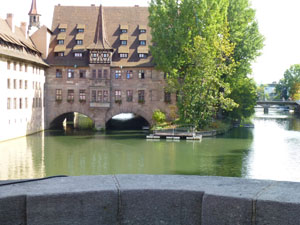
ドイツとかに行きます。
どこかしらで手ごろな建物の写真を撮ってきます。
この時、なるべく角度をつけず、真正面から水平に撮るようにします。
●STEP 2
準備として、制作ツールの規格にあわせてマップチップ素材の下地を作っておきます。
ひとマスひとマスが解りやすいよう、市松模様のレイヤーを作ってブランクのマップチップ全体に敷きます。

この画像は、RPGツクールXP用(ひとマス32×32px)です。
●STEP 3
写真から建物部分を切り出し、適当に縮小して、市松模様を敷いたマップチップの上に載せます。

↓
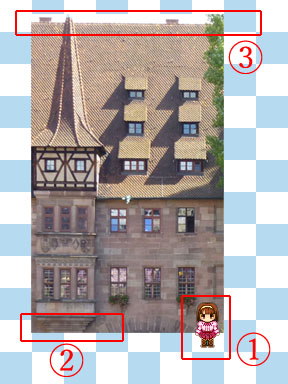
(1) 余白に実際に使用するキャラチップを置いておくと、
どの程度縮小すればいいのかの目安になります。
(2) 建物の下端がキャラクターを立たせたマスに少し
はみ出るように置きます。
(3) 建物の上端はぴったり市松模様の中に収めず、
上へはみ出すように置きます。
原寸比で(2)と(3)を両立できない場合は、拡大ツールで縦に伸縮してOK。
ここからちまちま加工してゆきます。
●STEP 4
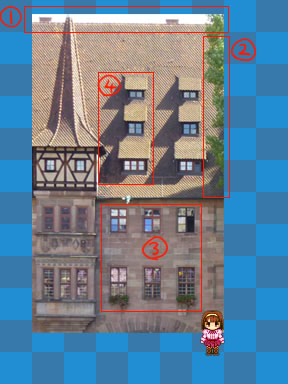
写真に写っている余分な要素を削除または修正していきます。
この写真では、建物の右側に入ってしまった樹木の緑や影、
開いたり閉まったりしている窓、
屋根の上の空部分などがこれに相当します。
解りやすくするために、背景の市松模様を暗くしました。
●STEP 4.1
消しゴムツールや選択ツールを使用して、空の色を抜きます。
この時点で、写真が厳密に水平ではないことに気付いたりしますが
(建物の上端と上端がぴったり同じ位置にこない)
とりあえず気にしなくてOKです。

●STEP 4.2
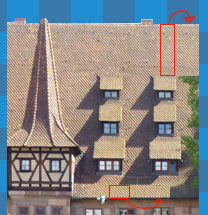
映り込んでしまった不要なものや余計な影を消します。
この場合は屋根なので、近くの屋根をコピーして、
貼り絵の要領で余計な部分を隠して行きます。
●STEP 4.3
窓など、並んでいる同一のものを一つのパターンに統一します。
写真だと照り返しや開き具合などがバラバラなので、これ、と思うパーツを選んでコピペしていきます。
どれもイマイチ……というときは、一番理想に近いパーツを手作業で少しいじってからコピペします。
下図では、※のついた窓は硝子の色などに修正を入れてからコピペしています。
更に、この画像では水の上に建っている建物を無理やり途中から切り取ったため、建物の下端が不自然になっています。
(アーチ橋状の構造が見えている)
このため、下端はアーチの一番上の部分を拾ってコピペし、平らになるよう処理していきます。
一通り処理を終えた段階で、こういう画像になります。

●STEP 5
建物中央線を決め、中央線からはみ出した部分を削除します。
(画像の赤くマスクをかけた部分)
なおこの作業の前に、下記の修正を行っています。
・建物真ん中の出っ張りの3階(木骨模様の部分)
→側面が見えていると左右反転する際に不自然になるため、側面を消す
・建物の上端(屋根)
→そのままだと水平ではないため、コピペを駆使して均す。
●STEP 6
必要に応じてキャンバスを拡大した後、
画像全体を複製し、左右反転してくっつけます。
ただし、上図の状態では影の向きも反転してしまうため、
影が濃く出ている部分は反転前の部分からコピーしてきて重ねなければなりません。
ついでに、屋根の色ムラが気になったので、あわせて修正を行いました。
手順としては、
1.屋根部分を明るい屋根の色(模様)で塗りつぶす。
2.右側の窓(影付き)をコピーして左側に重ね、
3.濃すぎる影を透明ブラシで薄くする。
4.窓についても同様に処理する。(※窓枠部分を選択して左右反転しただけ)
その処理を終えた状態が下記です。

まあまあマップチップっぽくなってきました。
●STEP 7
さて、ここまでコピペしたり反転したりとこねくり回して来たために、
画像の輪郭がぼやけている部分があると思います。
ので、画像の上に新規レイヤを一枚作成し、
モノクロ2値のペンを使って、輪郭(境界)をはっきりさせたい箇所を任意の色でなぞってゆきます。
一通りなぞり終えたら、レイヤーの透明度を調整し、いい感じになじませます。
輪郭をなぞる前(上)、なぞった後(下)
●STEP 8
ツクールXPの場合は、32×32を横に8マス(256px)縦は無制限という仕様なので、
作ったマップチップをその規格に流し込みます。
横幅がはみ出た部分は、折り返し下のマスへ入れてもよいのですが、
そうすると使い勝手が悪くなるので私は横256pxに合わせてチップを縮小しています。
ここまで来たらほぼ出来上がりです。
●STEP 9
最後に仕上げ加工です。
Photo Shop(あれば)で作ったマップチップの画像を開き、シャープフィルタをかけます。
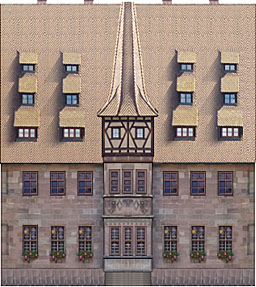
大分ぱきっとしたのではないでしょうか。
ベースはこれで完成です。後はお好みで、模様をつけたり消したり微修正をしておしまい。
●まとめ
これをいくつかの写真で繰り返すと、そこそこ統一感のあるマップチップが作れます。
一つ作ったチップの色調を変更して、色違いのパターンを作ってみるのもありですね。
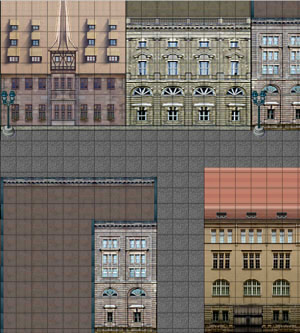
上記スクショのチップは、ほとんどすべて写真から作成しています。
(※街灯だけはRTP)
が、今回作成したチップ(左上)だけ違う街の写真から作ったため、
やはりちょっと浮いていますね。。
同じ街の写真から複数のチップを作ると、いい感じに統一感が出そうです。
以上、お役に立ちましたら幸いです。
ドット絵なんて描けない。
センス? 何それおいしいの? という私でも簡単にそれっぽいチップセット(建物外観)が作れます。
ぜひぜひ、色んな元写真で試してみて下さい。
●はじめに
本TIPSは、写真データをマップチップに加工するものです。
写真撮影の際は肖像権・著作権に留意し、トラブルのないようご注意ください。
加工には、画像ソフトが必要です(Photo Shop Elementsなど)
●STEP 1
どこかしらで手ごろな建物の写真を撮ってきます。
この時、なるべく角度をつけず、真正面から水平に撮るようにします。
●STEP 2
準備として、制作ツールの規格にあわせてマップチップ素材の下地を作っておきます。
ひとマスひとマスが解りやすいよう、市松模様のレイヤーを作ってブランクのマップチップ全体に敷きます。
この画像は、RPGツクールXP用(ひとマス32×32px)です。
●STEP 3
写真から建物部分を切り出し、適当に縮小して、市松模様を敷いたマップチップの上に載せます。
↓
(1) 余白に実際に使用するキャラチップを置いておくと、
どの程度縮小すればいいのかの目安になります。
(2) 建物の下端がキャラクターを立たせたマスに少し
はみ出るように置きます。
(3) 建物の上端はぴったり市松模様の中に収めず、
上へはみ出すように置きます。
原寸比で(2)と(3)を両立できない場合は、拡大ツールで縦に伸縮してOK。
ここからちまちま加工してゆきます。
●STEP 4
写真に写っている余分な要素を削除または修正していきます。
この写真では、建物の右側に入ってしまった樹木の緑や影、
開いたり閉まったりしている窓、
屋根の上の空部分などがこれに相当します。
解りやすくするために、背景の市松模様を暗くしました。
●STEP 4.1
消しゴムツールや選択ツールを使用して、空の色を抜きます。
この時点で、写真が厳密に水平ではないことに気付いたりしますが
(建物の上端と上端がぴったり同じ位置にこない)
とりあえず気にしなくてOKです。
●STEP 4.2
映り込んでしまった不要なものや余計な影を消します。
この場合は屋根なので、近くの屋根をコピーして、
貼り絵の要領で余計な部分を隠して行きます。
●STEP 4.3
窓など、並んでいる同一のものを一つのパターンに統一します。
写真だと照り返しや開き具合などがバラバラなので、これ、と思うパーツを選んでコピペしていきます。
どれもイマイチ……というときは、一番理想に近いパーツを手作業で少しいじってからコピペします。
下図では、※のついた窓は硝子の色などに修正を入れてからコピペしています。
更に、この画像では水の上に建っている建物を無理やり途中から切り取ったため、建物の下端が不自然になっています。
(アーチ橋状の構造が見えている)
このため、下端はアーチの一番上の部分を拾ってコピペし、平らになるよう処理していきます。
一通り処理を終えた段階で、こういう画像になります。
●STEP 5
建物中央線を決め、中央線からはみ出した部分を削除します。
(画像の赤くマスクをかけた部分)
なおこの作業の前に、下記の修正を行っています。
・建物真ん中の出っ張りの3階(木骨模様の部分)
→側面が見えていると左右反転する際に不自然になるため、側面を消す
・建物の上端(屋根)
→そのままだと水平ではないため、コピペを駆使して均す。
●STEP 6
必要に応じてキャンバスを拡大した後、
画像全体を複製し、左右反転してくっつけます。
ただし、上図の状態では影の向きも反転してしまうため、
影が濃く出ている部分は反転前の部分からコピーしてきて重ねなければなりません。
ついでに、屋根の色ムラが気になったので、あわせて修正を行いました。
手順としては、
1.屋根部分を明るい屋根の色(模様)で塗りつぶす。
2.右側の窓(影付き)をコピーして左側に重ね、
3.濃すぎる影を透明ブラシで薄くする。
4.窓についても同様に処理する。(※窓枠部分を選択して左右反転しただけ)
その処理を終えた状態が下記です。
まあまあマップチップっぽくなってきました。
●STEP 7
さて、ここまでコピペしたり反転したりとこねくり回して来たために、
画像の輪郭がぼやけている部分があると思います。
ので、画像の上に新規レイヤを一枚作成し、
モノクロ2値のペンを使って、輪郭(境界)をはっきりさせたい箇所を任意の色でなぞってゆきます。
一通りなぞり終えたら、レイヤーの透明度を調整し、いい感じになじませます。
輪郭をなぞる前(上)、なぞった後(下)
●STEP 8
ツクールXPの場合は、32×32を横に8マス(256px)縦は無制限という仕様なので、
作ったマップチップをその規格に流し込みます。
横幅がはみ出た部分は、折り返し下のマスへ入れてもよいのですが、
そうすると使い勝手が悪くなるので私は横256pxに合わせてチップを縮小しています。
ここまで来たらほぼ出来上がりです。
●STEP 9
最後に仕上げ加工です。
Photo Shop(あれば)で作ったマップチップの画像を開き、シャープフィルタをかけます。
大分ぱきっとしたのではないでしょうか。
ベースはこれで完成です。後はお好みで、模様をつけたり消したり微修正をしておしまい。
●まとめ
これをいくつかの写真で繰り返すと、そこそこ統一感のあるマップチップが作れます。
一つ作ったチップの色調を変更して、色違いのパターンを作ってみるのもありですね。
上記スクショのチップは、ほとんどすべて写真から作成しています。
(※街灯だけはRTP)
が、今回作成したチップ(左上)だけ違う街の写真から作ったため、
やはりちょっと浮いていますね。。
同じ街の写真から複数のチップを作ると、いい感じに統一感が出そうです。
以上、お役に立ちましたら幸いです。
 2016.11.08 22:11
|
2016.11.08 22:11
| 

浅海*慣れないことを色々やってみる。
2016.11.04
白狼恋歌2016、無事に公開の運びとなりました。
きっかけを頂いた皆様にはこの場を借りまして深く御礼申し上げます。
これで浅海も心置きなく恋歌2を再プレイできます。
あ、いえ、スチルは心置きです(正座)
さて、恋歌2リニューアルに伴いまして、ツイッターのRTキャンペーンなどをやっております。
12月末までに100行ったら御の字だなーということで、まずは100RT、無理目の目標で200RT、まず不可能で1000RTの三段階にて、到達ごとにルートを追加したりイベントを追加したりを予定しています。
概ね、煉>凍夜>兵治の順番で何かあると思っておいて頂ければ宜しいかと思います。
(必ずしもエンディングが増えるかどうかまでは保証しません)
下記のツイートをRT頂くことでRT数がカウントされてゆきますので、ぜひぜひ宜しくお願いいたします。
折角だから100までは行くといい、な!
200以降は色々考えることも多いのでぶっちゃけ到達したらどうしようというレベルですが、
その時はこれだけRTして頂いたんだから!という所で頑張りたいと思います。
また、このまま放っておくとまあ、12月末までに100RTも無理だろうということで、定期的な広告がわりとして落書などを投下していこうかなと思い。

いい感じに広告っぽく加工できたらいいんですが、それはそれでちょっとうざったいかなぁとか。
きっかけを頂いた皆様にはこの場を借りまして深く御礼申し上げます。
これで浅海も心置きなく恋歌2を再プレイできます。
あ、いえ、スチルは心置きです(正座)
さて、恋歌2リニューアルに伴いまして、ツイッターのRTキャンペーンなどをやっております。
12月末までに100行ったら御の字だなーということで、まずは100RT、無理目の目標で200RT、まず不可能で1000RTの三段階にて、到達ごとにルートを追加したりイベントを追加したりを予定しています。
概ね、煉>凍夜>兵治の順番で何かあると思っておいて頂ければ宜しいかと思います。
(必ずしもエンディングが増えるかどうかまでは保証しません)
下記のツイートをRT頂くことでRT数がカウントされてゆきますので、ぜひぜひ宜しくお願いいたします。
折角だから100までは行くといい、な!
【無料乙女ADV&RPG】白狼恋歌~蒼龍開眼~2016年版配信中。本プロモーション画像のRT数に応じて、イベント&ルート追加を行います!詳細は画像内の説明をご確認ください。あらすじ・登場人物などゲームの詳細とDLは公式サイトから!https://t.co/gW8a2rR4T8 pic.twitter.com/XZpKS50o1Z
— ぶつりしつ(1日目東タ-40b) (@PhysicalRoomCSK) 2016年11月2日
200以降は色々考えることも多いのでぶっちゃけ到達したらどうしようというレベルですが、
その時はこれだけRTして頂いたんだから!という所で頑張りたいと思います。
また、このまま放っておくとまあ、12月末までに100RTも無理だろうということで、定期的な広告がわりとして落書などを投下していこうかなと思い。

いい感じに広告っぽく加工できたらいいんですが、それはそれでちょっとうざったいかなぁとか。
TIPS for making Mapchips/Tilesets from Photograph
2016.11.03
** Introduction **
Here I introduce tips for making mapchip/tileset of RPG Maker series EASILY from photographs.
To take/process photos for making mapchips, please be careful not to infringe on someone's copyrights or portrait rights, etc.
In order to process photos, image processing software such as Photo Shop or SAI is needed.
** STEP 1 **
Take a photo of building/architecture at desired place.
The photo shall be taken squarely and horizontally against the subject as much as possible.
** STEP 2 **
Before starting actual work, prepare template of mapchip/tileset.
Size and standard of the materials will be different depending on your creation tool.
(RPG Maker 2000, XP, VX or MV...)
In this article, following pattern will be used as per material standard of RPG Maker XP.
(Size of single chip is 32 x 32 px)
** STEP 3 **
First, clip a part of bulding from the photo.
Then reduce an image size and put the resized image on the template.
↓
(1) Put some character chips for your reference on upper layer.
It will help you to decide a size of building.
(2) Put the resized photo on mapchip/tileset template.
Lower end of the building shall run off a template grid to vertical direction.
(3) Upper end of the building shall run off a template grid to vertical direction.
If it is impossible to realize (2) and (3) with original propotion, the image can be shorten/lengthen.
** STEP 4 **
Retouch the image by removing/or modifying unnecessary parts.
In this case, green leaves on right end of the building, deep shadows, windows or sky over the roof.
** STEP 4.1 **
Remove color of sky with eraser/select tool.
Even if you notice that the building is not completely horizontal, you do not have to care about it.
** STEP 4.2 **
Erase unnecessary items/shadows by copy & paste image.
To erase green leaves on right end of the roof, for example, copy some area of plain roof and paste on leaves to hide them.
** STEP 4.3 **
Unify elements lining on the building such as windows or plants.
For example, as every window in original photo are different in its color or reflection, choose and copy the one which you want to use and paste it to the other windows.
If you need to modify color, etc. of the part, modify it before copy & paste.
The parts marked with yellow "※" are modified its color before copy & paste.
Furthermore, as the image of the building is clipped from picture of the building built over river, lower end of the building seems to be unnatural with its bridge-like structure.
To modify this, copy the top of the bridge-like structure and paste it to make lower end of the building flat.
** STEP 5 **
Define center line of the building and delete a part beyond the center line.
In the following image, the part masked with red shall be deleted.
FYI, following modifications have been made at this stage.
* Jetty part at center of the building (the part with timber framing)
-> Erase side surface considering subsequent process.
* Upper end of building (roof)
-> Make the end of roof flat by copy & paste.
** STEP 6 **
If you have two or more working layers at the moment, merge them to one single layer.
Then, replicate the layer and flip it horizontally, and merge the two layers again.
Without any modification, however, orientation of shadows will also be reversed.
To modify this, you need to copy the part where deep shadows exist from original image before flipping.
<< Procedure >>
1. Copy the plain roof part and paste it covering left half of the roof.
2. Copy the part includes windows from right half of the roof and paste it on left side.
3. Weaken deep shadows with eraser or erasing brush.
4. Flip each window horizontally.
The image after the above mentioned procedure.
** STEP 7 **
Create new layer on the image.
To emphasize outlines of each part, trace the outlines with pencil tool.
Please note, the pencil tool for tracing shall be preferably two-valued pencil without anti-aliasing.
If you use pencil tool with anti-aliasing, the image will become blurred.
After the tracing, adjust transparency of the tracing layer to make it more natural.
Before tracing (Top), After tracing(Bottom)
** STEP 8 **
Merge layers and put the image on tilesets template.
In case of RPG Maker XP, size of tilesets is stated as follows:
Single chip: 32 x 32 px.
Tile sets (W): 256 px (8 chips in horizontal column)
Tile sets (L): 32 x N (No Limitation)
This time, I resized the image horizontally to fit 256px width.
** STEP 9 **
If you own Photo Shop or equivalent software, sharpen the image by filter.
In case of the following image, the image has been sharpen by "Smart Sharp (50%)."
** Application Example **
Except street lamps and wooden gate, all the building chips in following image are made from photo.
