ゲーム制作の進捗報告、その他雑談等々。
TIPS for making Mapchips/Tilesets from Photograph
2016.11.03
** Introduction **
Here I introduce tips for making mapchip/tileset of RPG Maker series EASILY from photographs.
To take/process photos for making mapchips, please be careful not to infringe on someone's copyrights or portrait rights, etc.
In order to process photos, image processing software such as Photo Shop or SAI is needed.
** STEP 1 **
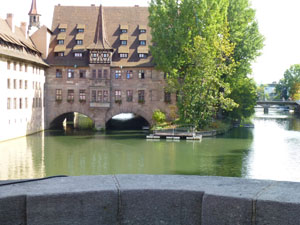
Take a photo of building/architecture at desired place.
The photo shall be taken squarely and horizontally against the subject as much as possible.
** STEP 2 **
Before starting actual work, prepare template of mapchip/tileset.
Size and standard of the materials will be different depending on your creation tool.
(RPG Maker 2000, XP, VX or MV...)
In this article, following pattern will be used as per material standard of RPG Maker XP.
(Size of single chip is 32 x 32 px)

** STEP 3 **
First, clip a part of bulding from the photo.
Then reduce an image size and put the resized image on the template.

↓
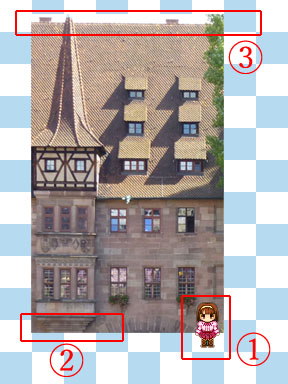
(1) Put some character chips for your reference on upper layer.
It will help you to decide a size of building.
(2) Put the resized photo on mapchip/tileset template.
Lower end of the building shall run off a template grid to vertical direction.
(3) Upper end of the building shall run off a template grid to vertical direction.
If it is impossible to realize (2) and (3) with original propotion, the image can be shorten/lengthen.
** STEP 4 **
Retouch the image by removing/or modifying unnecessary parts.
In this case, green leaves on right end of the building, deep shadows, windows or sky over the roof.
** STEP 4.1 **
Remove color of sky with eraser/select tool.
Even if you notice that the building is not completely horizontal, you do not have to care about it.

** STEP 4.2 **
Erase unnecessary items/shadows by copy & paste image.
To erase green leaves on right end of the roof, for example, copy some area of plain roof and paste on leaves to hide them.
** STEP 4.3 **
Unify elements lining on the building such as windows or plants.
For example, as every window in original photo are different in its color or reflection, choose and copy the one which you want to use and paste it to the other windows.
If you need to modify color, etc. of the part, modify it before copy & paste.
The parts marked with yellow "※" are modified its color before copy & paste.
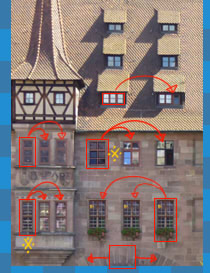
Furthermore, as the image of the building is clipped from picture of the building built over river, lower end of the building seems to be unnatural with its bridge-like structure.
To modify this, copy the top of the bridge-like structure and paste it to make lower end of the building flat.

** STEP 5 **
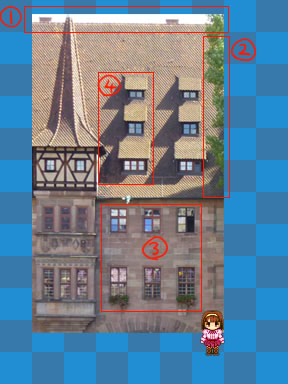
Define center line of the building and delete a part beyond the center line.
In the following image, the part masked with red shall be deleted.
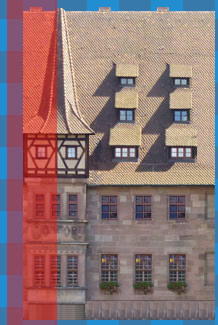
FYI, following modifications have been made at this stage.
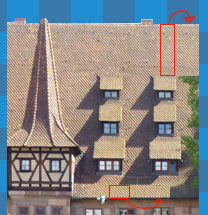
* Jetty part at center of the building (the part with timber framing)
-> Erase side surface considering subsequent process.
* Upper end of building (roof)
-> Make the end of roof flat by copy & paste.
** STEP 6 **
If you have two or more working layers at the moment, merge them to one single layer.
Then, replicate the layer and flip it horizontally, and merge the two layers again.
Without any modification, however, orientation of shadows will also be reversed.
To modify this, you need to copy the part where deep shadows exist from original image before flipping.
<< Procedure >>
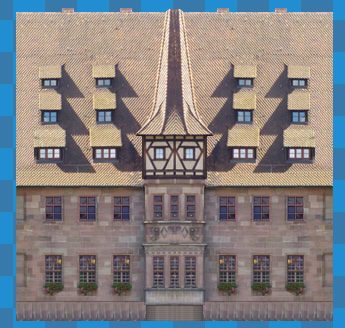
1. Copy the plain roof part and paste it covering left half of the roof.
2. Copy the part includes windows from right half of the roof and paste it on left side.
3. Weaken deep shadows with eraser or erasing brush.
4. Flip each window horizontally.
The image after the above mentioned procedure.

** STEP 7 **
Create new layer on the image.
To emphasize outlines of each part, trace the outlines with pencil tool.
Please note, the pencil tool for tracing shall be preferably two-valued pencil without anti-aliasing.
If you use pencil tool with anti-aliasing, the image will become blurred.
After the tracing, adjust transparency of the tracing layer to make it more natural.
Before tracing (Top), After tracing(Bottom)
** STEP 8 **
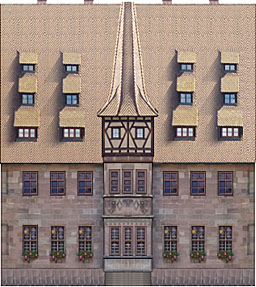
Merge layers and put the image on tilesets template.
In case of RPG Maker XP, size of tilesets is stated as follows:
Single chip: 32 x 32 px.
Tile sets (W): 256 px (8 chips in horizontal column)
Tile sets (L): 32 x N (No Limitation)
This time, I resized the image horizontally to fit 256px width.
** STEP 9 **
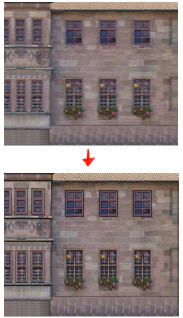
If you own Photo Shop or equivalent software, sharpen the image by filter.
In case of the following image, the image has been sharpen by "Smart Sharp (50%)."
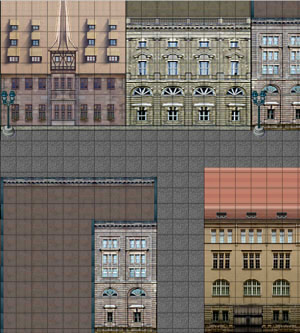
** Application Example **
Except street lamps and wooden gate, all the building chips in following image are made from photo.
Here I introduce tips for making mapchip/tileset of RPG Maker series EASILY from photographs.
To take/process photos for making mapchips, please be careful not to infringe on someone's copyrights or portrait rights, etc.
In order to process photos, image processing software such as Photo Shop or SAI is needed.
** STEP 1 **
Take a photo of building/architecture at desired place.
The photo shall be taken squarely and horizontally against the subject as much as possible.
** STEP 2 **
Before starting actual work, prepare template of mapchip/tileset.
Size and standard of the materials will be different depending on your creation tool.
(RPG Maker 2000, XP, VX or MV...)
In this article, following pattern will be used as per material standard of RPG Maker XP.
(Size of single chip is 32 x 32 px)
** STEP 3 **
First, clip a part of bulding from the photo.
Then reduce an image size and put the resized image on the template.
↓
(1) Put some character chips for your reference on upper layer.
It will help you to decide a size of building.
(2) Put the resized photo on mapchip/tileset template.
Lower end of the building shall run off a template grid to vertical direction.
(3) Upper end of the building shall run off a template grid to vertical direction.
If it is impossible to realize (2) and (3) with original propotion, the image can be shorten/lengthen.
** STEP 4 **
Retouch the image by removing/or modifying unnecessary parts.
In this case, green leaves on right end of the building, deep shadows, windows or sky over the roof.
** STEP 4.1 **
Remove color of sky with eraser/select tool.
Even if you notice that the building is not completely horizontal, you do not have to care about it.
** STEP 4.2 **
Erase unnecessary items/shadows by copy & paste image.
To erase green leaves on right end of the roof, for example, copy some area of plain roof and paste on leaves to hide them.
** STEP 4.3 **
Unify elements lining on the building such as windows or plants.
For example, as every window in original photo are different in its color or reflection, choose and copy the one which you want to use and paste it to the other windows.
If you need to modify color, etc. of the part, modify it before copy & paste.
The parts marked with yellow "※" are modified its color before copy & paste.
Furthermore, as the image of the building is clipped from picture of the building built over river, lower end of the building seems to be unnatural with its bridge-like structure.
To modify this, copy the top of the bridge-like structure and paste it to make lower end of the building flat.
** STEP 5 **
Define center line of the building and delete a part beyond the center line.
In the following image, the part masked with red shall be deleted.
FYI, following modifications have been made at this stage.
* Jetty part at center of the building (the part with timber framing)
-> Erase side surface considering subsequent process.
* Upper end of building (roof)
-> Make the end of roof flat by copy & paste.
** STEP 6 **
If you have two or more working layers at the moment, merge them to one single layer.
Then, replicate the layer and flip it horizontally, and merge the two layers again.
Without any modification, however, orientation of shadows will also be reversed.
To modify this, you need to copy the part where deep shadows exist from original image before flipping.
<< Procedure >>
1. Copy the plain roof part and paste it covering left half of the roof.
2. Copy the part includes windows from right half of the roof and paste it on left side.
3. Weaken deep shadows with eraser or erasing brush.
4. Flip each window horizontally.
The image after the above mentioned procedure.
** STEP 7 **
Create new layer on the image.
To emphasize outlines of each part, trace the outlines with pencil tool.
Please note, the pencil tool for tracing shall be preferably two-valued pencil without anti-aliasing.
If you use pencil tool with anti-aliasing, the image will become blurred.
After the tracing, adjust transparency of the tracing layer to make it more natural.
Before tracing (Top), After tracing(Bottom)
** STEP 8 **
Merge layers and put the image on tilesets template.
In case of RPG Maker XP, size of tilesets is stated as follows:
Single chip: 32 x 32 px.
Tile sets (W): 256 px (8 chips in horizontal column)
Tile sets (L): 32 x N (No Limitation)
This time, I resized the image horizontally to fit 256px width.
** STEP 9 **
If you own Photo Shop or equivalent software, sharpen the image by filter.
In case of the following image, the image has been sharpen by "Smart Sharp (50%)."
** Application Example **
Except street lamps and wooden gate, all the building chips in following image are made from photo.
 2016.11.03 00:47
|
2016.11.03 00:47
| 

